TipCalc iOS Project
EditWe started with the goal of creating an app to help calculate what tip to leave in a restaurant.
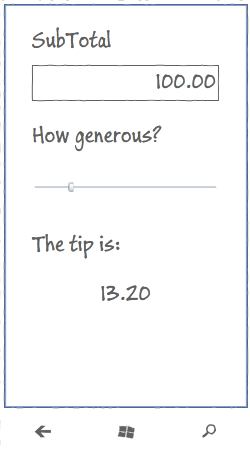
We had a plan to produce a UI based on this concept:
To satisfy this we built a ‘Core’ .NET Standard project which contained:
- Our ‘business logic’ -
ICalculationService - Our ViewModel -
TipViewModel - Our
App- which contains some bootstrapping code.
We even added our first User Interface - for Xamarin.Android.
Now let’s move forward to Xamarin.iOS.
Same as we did with the Core project, we will use a standard template to create the iOS project.
Create a new iOS Project
Add a new project to your solution - a ‘Blank App (iOS)’ application with name TipCalc.iOS.
Within this, you’ll find the normal iOS application constructs:
- The
Resourcesfolder - The
AppDelegate.csclass - The
Entitlements.plist, which contains certain configurations - we won’t touch it for now. - The
Info.plistfile, which is the equivalent for an Android ApplicationManifest. - The
Main.csclass - The
Main.storyboardview - A default
ViewControllerxib and class
Install MvvmCross
Open the Nuget Package Manager and search for the package MvvmCross.
If you don’t really enjoy the NuGet UI experience, then you can alternatively open the Package Manager Console, and type:
Install-Package MvvmCross
Delete ViewController.cs and Main.storyboard
Because we will add our own view.
After you have deleted those, open the Info.plist file and under the ‘Deployment Info’ section, remove the text in the ‘Main Interface’ input (leave it blank).
Add a reference to TipCalc.Core project
Add a reference to your TipCalc.Core project - the project we created in the first step.
Edit the AppDelegate.cs file
The AppDelegate class plays a very important role on iOS apps, as it provides a set of callback that the OS uses to inform you about events in your application’s lifecycle.
It will also allow us to specify the MvvmCross framework some key classes to be used for initialization, the same way the Android MainApplication did. This is what your AppDelegate class should look like:
using Foundation;
using UIKit;
using TipCalc.Core;
using MvvmCross.Platforms.Ios.Core;

namespace TipCalc.iOS
{
    [Register(nameof(AppDelegate))]
    public class AppDelegate : MvxApplicationDelegate<MvxIosSetup<App>, App>
    {
        public override UIWindow Window { get; set; }

        // FinishedLaunching is the very first code to be executed in your app. Don't forget to call base!
        public override bool FinishedLaunching(UIApplication application, NSDictionary launchOptions)
        {
            var result = base.FinishedLaunching(application, launchOptions);

            return result;
        }
    }
}
In the code snippet above, we’re extending the app’s AppDelegate from MvxApplicationDelegate, and that class contains two generics: one for a setup class, and one for a core app class.
In our case, we want to use the default Setup class MvvmCross provides for iOS applications. In your own app, you may want to use a custom one, which extends MvxIosSetup<App>, to add some customization.
That’s it! MvvmCross is up and running after this small addition.
Some more details about the Setup class
Every MvvmCross UI project requires a Setup class, but if your app is fairly simple, like the TipCalc is, then you can safely use the default one, provided by the framework.
The Setup class is responsible for performing the initialization of the MvvmCross framework, including:
- The IoC Container and DI engine
- The Data-Binding engine
- The ViewModel / View lookups
- The whole navigation system
- Plugins
Finally, the Setup class is also responsible for initializing your App class.
Luckily for us, all this functionality is provided for you automatically, unless you want / need to use a custom Setup class (since it is an excellent place to register your own services / plugins, it is often the case).
Add your View
Create an initial UIViewController
Create a folder called Views.
Within this, add a new ‘View Controller’ and call it TipView.
This will generate three classes:
- TipView.cs
- TipView.designer.cs
- TipView.xib
Edit the XIB layout
Double click on the XIB file to edit it.
Just as we did with Android, we won’t go into depth here about how to use the XIB iOS editor - instead we will just cover the bare basics.
Drag/Drop from the ‘Toolbox’ to add:
- A
Labelwhich text should beSubTotaland aTextFieldnamedSubTotalTextField, for editing the value - A
Labelwhich text should beGenerosityand aSlidernamedGenerositySlider, for editing the “generosity” - a
LabelnamedTipLabel,for showing theTipresult
Set the Maximum Value of the Slider to ‘100’.
Using drag and drop, you should be able to quite quickly generate a design similar what we accomplished on Android.
Edit TipView.cs
Because we want our TipView to be not only a UIViewController but also an MVVM View, then change the inheritance of TipView so that it inherits from MvxViewController.
public class TipView : MvxViewController<TipViewModel>
The generic parameter to MvxViewController is used to link TipView to TipViewModel.
To add the data-binding code, go to the ViewDidLoad method in your TipView class. This is a method that will be called after the View is loaded within iOS but before it is displayed on the screen.
This makes ViewDidLoad a perfect place for us to call some data-binding extension methods which will specify how we want the UI data-bound to the ViewModel:
public override void ViewDidLoad()
{
    base.ViewDidLoad();

    var set = CreateBindingSet();
    set.Bind(TipLabel).To(vm => vm.Tip);
    set.Bind(SubTotalTextField).To(vm => vm.SubTotal);
    set.Bind(GenerositySlider).To(vm => vm.Generosity);
    set.Apply();
}
What this code does is to generate ‘in code’ exactly the same type of data-binding information as we generated ‘in XML’ in Android. This binding syntax is called fluent.
Note You need to add all the bindings after base.ViewDidLoad() runs, because that’s where MvvmCross locates the TipViewModel.
Also note that after you specify all your bindings, you must call set.Apply() for them to be added.
Altogether this looks like:
using MvvmCross.Platforms.Ios.Views;
using TipCalc.Core.ViewModels;
using UIKit;

namespace TipCalc.iOS
{
    public partial class TipView : MvxViewController<TipViewModel>
    {
        public TipView() : base(nameof(TipView), null)
        {
        }

        public override void ViewDidLoad()
        {
            base.ViewDidLoad();

            var set = CreateBindingSet();
            set.Bind(TipLabel).To(vm => vm.Tip);
            set.Bind(SubTotalTextField).To(vm => vm.SubTotal);
            set.Bind(GenerositySlider).To(vm => vm.Generosity);
            set.Apply();

            // this is optional. What this code does is to close the keyboard whenever you
            // tap on the screen, outside the bounds of the TextField
            View.AddGestureRecognizer(new UITapGestureRecognizer(() =>
            {
                this.SubTotalTextField.ResignFirstResponder();
            }));
        }
    }
}
Binding in Xamarin.iOS
You may have noticed that data-binding in iOS looks very different to the way it looked in Android.
This is because the XIB format used in iOS is a lot less human manipulable and extensible than the XML formats used in Android AXML and or Xamarin.Forms / Windows XAML - so it makes more sense to use C# rather than the XIB to register our bindings.
Within this section of the tutorial all of our iOS bindings look like:
set.Bind(TipLabel).To(vm => vm.Tip);
what this line means is:
- Bind the
TipLabel’s default binding property - which happens to be theTextproperty (for labels) - To the
ViewModel’s Tip property
If you had wanted to specify the TipLabel property to use instead of relying on the default, then you could have done this with:
set.Bind(TipLabel).For(v => v.Text).To(vm => vm.Tip);
Although this sample only shows simple bindings, the infrastructure built within MvvmCross is really powerful! Our data-binding engine supports ValueConverters, ValueCombiners, FallbackValues, different modes of bindings and a super straight forward mechanism to add your own custom bindings.
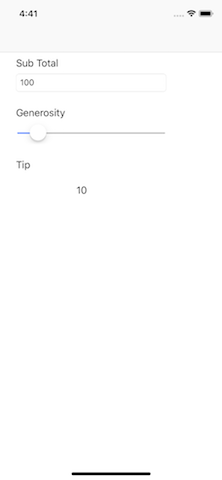
The iOS UI is complete!
At this point you should be able to run your application and see some magic.
When it starts… you should see:
Moving on…
There’s more we could do to make this User Interface nicer and to make the app richer… but for this first application, we will leave it here for now.
Let’s move on to Windows!