TipCalc WPF Project
EditWe started with the goal of creating an app to help calculate what tip to leave in a restaurant.
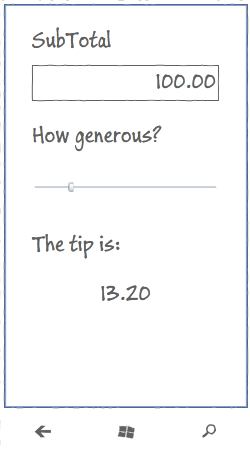
We had a plan to produce a UI based on this concept:
To satisfy this we built a ‘Core’ .NET Core project which contained:
- Our ‘business logic’ -
ICalculationService - Our ViewModel -
TipViewModel - Our
App- which contains some bootstrapping code.
Now let’s build a UI for WPF (Windows Presentation Foundation)!
Once again, we will build up a new project ‘from empty’, just as we did before.
Create a new WPF Project
Add a new project to your solution - a ‘WPF App (.NET Core)’ named TipCalc.WPF.
Within this, you will find the normal WPF application constructs:
- The
App.xamlfile, which we will edit shortly - A
MainWindow.xamlandMainWindow.xaml.csfiles that define a default Window for this app
Keep(!) MainWindow.xaml
We do actually want a MainWindow for this app :)
Install MvvmCross
Open the Nuget Package Manager and search for the package MvvmCross.
If you don’t really enjoy the NuGet UI experience, then you can alternatively open the Package Manager Console, and type:
Install-Package MvvmCross
Install MvvmCross.Platforms.Wpf
Same as you did with the MvvmCross package, install the specific one for Wpf.
Install-Package MvvmCross.Platforms.Wpf
Add a reference to TipCalc.Core project
Add a reference to your TipCalc.Core project - the project we created in the first step.
Edit App.xaml.cs
WPF will be an easy addition if you have followed the article for UWP. On this platform, the App class also plays a very important role, as it provides a set of callback that the OS uses to inform you about events in your application’s lifecycle. We won’t dig further into it’s responsibilities, but you may want to read about it in the official documentation.
Open the App.xaml.cs and delete all the class content. Leave only the default class and make it extend MvxApplication:
public partial class App : MvxApplication
Altogether this is what your App.xaml.cs should loook like:
using MvvmCross.Platforms.Wpf.Views;

namespace TipCalc.WPF;

public partial class App : MvxApplication
{
}
Edit App.xaml
Now it’s time to edit the xaml part of our WPF App class. Open the file and replace all the content for this code:
<views:MvxApplication  xmlns:views="clr-namespace:MvvmCross.Platforms.Wpf.Views;assembly=MvvmCross.Platforms.Wpf"
             x:Class="TipCalc.WPF.App"
             xmlns="http://schemas.microsoft.com/winfx/2006/xaml/presentation"
             xmlns:x="http://schemas.microsoft.com/winfx/2006/xaml"
             xmlns:local="clr-namespace:TipCalc.WPF"
             StartupUri="MainWindow.xaml">
</views:MvxApplication>
Create Setup class
Every MvvmCross UI project requires a Setup class. The Setup class is responsible for performing the initialization of the MvvmCross framework, including:
- The IoC Container and DI engine
- The Data-Binding engine
- The ViewModel / View lookups
- The whole navigation system
- Plugins
Finally, the Setup class is also responsible for initializing your App class.
Let’s create Setup class:
using Microsoft.Extensions.Logging;
using MvvmCross.Platforms.Wpf.Core;

namespace TipCalc.WPF;

public class Setup : MvxWpfSetup<Core.App>
{
    protected override ILoggerFactory? CreateLogFactory() => default!;

    protected override ILoggerProvider? CreateLogProvider() => default!;
}
Make MainWindow be a MvvmCross window
Open up MainWindow.xaml.cs and change the base class to MvxWindow:
using MvvmCross.Platforms.Wpf.Views;

namespace TipCalc.WPF;

public partial class MainWindow : MvxWindow
{
    public MainWindow()
    {
        InitializeComponent();
    }
}
Now open the XAML document and apply the same change:
<views:MvxWindow  x:Class="TipCalc.WPF.MainWindow"
        xmlns="http://schemas.microsoft.com/winfx/2006/xaml/presentation"
        xmlns:x="http://schemas.microsoft.com/winfx/2006/xaml"
        xmlns:d="http://schemas.microsoft.com/expression/blend/2008"
        xmlns:mc="http://schemas.openxmlformats.org/markup-compatibility/2006"
        xmlns:local="clr-namespace:TipCalc.WPF"
        xmlns:views="clr-namespace:MvvmCross.Platforms.Wpf.Views;assembly=MvvmCross.Platforms.Wpf"
        mc:Ignorable="d"
        Title="MainWindow" Height="450" Width="800">
    <Grid>
    </Grid>
</views:MvxWindow>
Add your View
Create the UserControl
Create a folder named Views.
Within this folder, add a new ‘User Control (WPF)’ and call it TipView.xaml
This will generate two files:
TipView.xamlTipView.xaml.cs
Turn TipView into the MvvmCross View for TipViewModel
Open the TipView.xaml.cs file.
Change the class to inherit from MvxWpfView<T>
public partial class TipView : MvxWpfView<TipViewModel>
Altogether this looks like:
using MvvmCross.Platforms.Wpf.Views;
using TipCalc.Core.ViewModels;

namespace TipCalc.WPF.Views;

public partial class TipView : MvxWpfView<TipViewModel>
{
    public TipView()
    {
        InitializeComponent();
    }
}
Now in TipView your can get access to TipViewModel instance using ViewModel property. In xaml code you can access all view model public properties directly. It is available because the DataContext view property refers to view model instance.
Edit the XAML layout
Double click on the XAML file. At this point we will just assume you understand the basics of XAML editing. If you need further explanations on that, please take a read at the WPF official documentation. We will concentrate on the MvvmCross specific bits only.
Change the root node from:
<UserControl
         ...>
</UserControl>
To:
<views:MvxWpfView
    x:TypeArguments="viewModels:TipViewModel"
    xmlns:views="clr-namespace:MvvmCross.Platforms.Wpf.Views;assembly=MvvmCross.Platforms.Wpf"
    xmlns:viewModels="clr-namespace:TipCalc.Core.ViewModels;assembly=TipCalc.Core"
        ...>
</views:MvxWpfView>
We now need to fill the content of the view with some widgets:
- Add a
StackPanelcontainer. Then inside of it, add:- A
TextBlockwhich text should beSubTotal - A bound
TextBoxfor theSubTotalproperty ofTipViewModel - A
TextBlockwhich text should beGenerosity - A bound
Sliderfor theGenerosityproperty ofTipViewModel - A
TextBlockwhich text should beTip to leave - A bound
TextBlockfor theTipproperty ofTipViewModel
- A
This will produce finished XAML like:
<views:MvxWpfView
    x:TypeArguments="viewModels:TipViewModel"
    xmlns:views="clr-namespace:MvvmCross.Platforms.Wpf.Views;assembly=MvvmCross.Platforms.Wpf"
    xmlns:viewModels="clr-namespace:TipCalc.Core.ViewModels;assembly=TipCalc.Core"
    x:Class="TipCalc.WPF.Views.TipView"
    xmlns="http://schemas.microsoft.com/winfx/2006/xaml/presentation"
    xmlns:x="http://schemas.microsoft.com/winfx/2006/xaml"
    xmlns:mc="http://schemas.openxmlformats.org/markup-compatibility/2006"
    xmlns:d="http://schemas.microsoft.com/expression/blend/2008"
    xmlns:local="clr-namespace:TipCalc.WPF.Views"
    mc:Ignorable="d"
    d:DesignHeight="450" d:DesignWidth="800" d:DataContext="{d:DesignInstance viewModels:TipViewModel }">
    <Grid>
        <StackPanel Margin="12,0,12,0">
            <TextBlock Text="SubTotal" />
            <TextBox Text="{Binding SubTotal, Mode=TwoWay, UpdateSourceTrigger=PropertyChanged}" />
            <TextBlock Text="Generosity" />
            <Slider Value="{Binding Generosity,Mode=TwoWay}"
                    SmallChange="1"
                    LargeChange="10"
                    Minimum="0"
                    Maximum="100" />
            <TextBlock Text="Tip to leave" />
            <TextBlock Text="{Binding Tip}" />
        </StackPanel>
    </Grid>
</views:MvxWpfView>
Note that in XAML, OneWay binding is generally the default. To provide TwoWay binding we explicitly add Mode to our binding expressions: e.g. Value="{Binding Generosity,Mode=TwoWay}"
Second note the binding for the TextBox uses UpdateSourceTrigger=PropertyChanged so that the SubTotal property of TipViewModel is updated immediately rather than when the TextBox loses focus.
Although this sample only shows simple bindings, the infrastructure built within MvvmCross is really powerful! Our data-binding engine supports ValueConverters, ValueCombiners, FallbackValues, different modes of bindings and a super straight forward mechanism to add your own custom bindings.
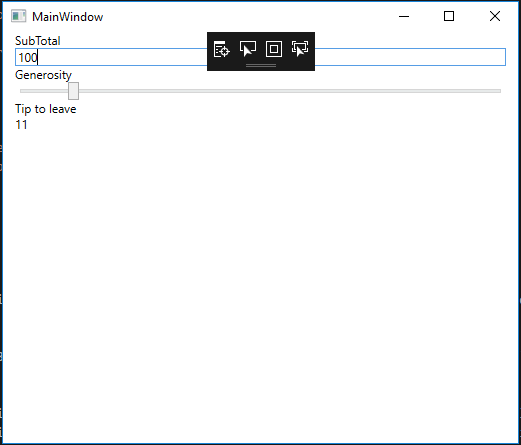
The Wpf UI is complete!
At this point you should be able to run your application.
When it starts… you should see something like this:
Moving on…
There’s more we could do to make this User Interface nicer and to make the app richer… but for this first application, we will leave it here for now.
Stay tuned, because for the next step, we will completely change the approach and build a Xamarin.Forms version.