TipCalc UWP Project
EditWe started with the goal of creating an app to help calculate what tip to leave in a restaurant.
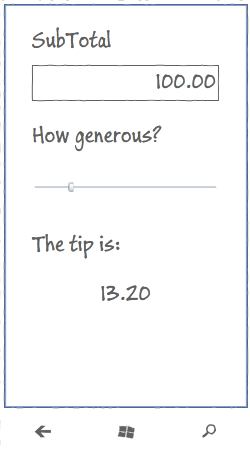
We had a plan to produce a UI based on this concept:
To satisfy this we built a ‘Core’ .NET Standard project which contained:
- Our ‘business logic’ -
ICalculationService - Our ViewModel -
TipViewModel - Our
App- which contains some bootstrapping code.
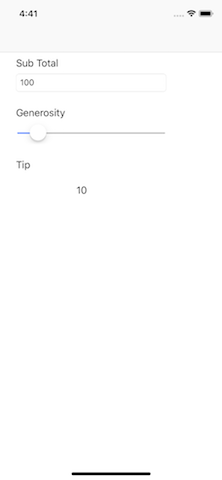
We even added User Interfaces for Xamarin.Android and Xamarin.iOS so far:

For our next project, let’s look at Windows! More specifically, let’s build a Universal Windows Platform (UWP) App.
Same as we did with the Core project, we will use a standard template to create the UWP project - although you can of course use a project template wizard.
Create a new Windows UWP Project
Add a new project to your solution - a ‘Blank App (Universal Windows)’ application with name TipCalc.UWP. Set it’s minimum version to Windows 10 Fall Creators Update as that is the minimum version which supports .NET Standard 2.0.
Within this new project, you’ll find the normal UWP application constructs:
- The
Propertiesfolder with just theAssemblyInfofile - The
Assetsfolder - An
App.xamland theApp.xaml.csfiles. The ‘application’ class - A
MainPage.xamlandMainPage.xaml.csfiles that define the default Page for this app - The
Package.appxmanifestconfiguration file - The debug private key for your development
Delete MainPage.xaml
No-one really needs a default MainPage :)
Install MvvmCross
Open the Nuget Package Manager and search for the package MvvmCross.
If you don’t really enjoy the NuGet UI experience, then you can alternatively open the Package Manager Console, and type:
Install-Package MvvmCross
Add a reference to TipCalc.Core project
Add a reference to your TipCalc.Core project - the project we created in the first step.
Edit App.xaml.cs
The App class plays a very important role on UWP apps, as it provides a set of callback that the OS uses to inform you about events in your application’s lifecycle. We won’t dig further into it’s responsibilities, but you may want to read about it in the official documentation for the platform.
Open the App.xaml.cs and delete all the class content. Leave only the default constructor in place:
public sealed partial class App
{
    public App()
    {
        InitializeComponent();
    }
}
On the same file add another class, which will contain the necessary information to get MvvmCross up and running:
public abstract class TipCalcApp : MvxApplication<MvxWindowsSetup<Core.App>, Core.App>
{
}
We will use this class in Xaml. It extends MvxApplication and providers two generic parameters:
MvxWindowsSetup<Core.App>tells MvvmCross we want to use the default Setup class for UWP.Core.Appis our Core application class.
Wrapping everything together, this is what the App.xaml.cs class should look like at the end:
using MvvmCross.Platforms.Uap.Core;
using MvvmCross.Platforms.Uap.Views;

namespace TipCalc.UWP
{
    public sealed partial class App
    {
        public App()
        {
            InitializeComponent();
        }
    }

    public abstract class TipCalcApp : MvxApplication<MvxWindowsSetup<Core.App>, Core.App>
    {
    }
}
Edit App.xaml
Now it’s time to edit the xaml part of our UWP App class. Open the file and replace all the content for this code:
<local:TipCalcApp x:Class="TipCalc.UWP.App"
                        xmlns="http://schemas.microsoft.com/winfx/2006/xaml/presentation"
                        xmlns:x="http://schemas.microsoft.com/winfx/2006/xaml"
                        xmlns:local="using:TipCalc.UWP"
                        RequestedTheme="Light">
    <Application.Resources>
        <x:String x:Key="WelcomeText">Hello World!</x:String>
    </Application.Resources>
</local:TipCalcApp>
What this code snippet does, is to set the App base class type to TipCalcApp.
Some more details about the Setup class
Every MvvmCross UI project requires a Setup class, but if your app is fairly simple, like the TipCalc is, then you can safely use the default one, provided by the framework.
The Setup class is responsible for performing the initialization of the MvvmCross framework, including:
- The IoC Container and DI engine
- The Data-Binding engine
- The ViewModel / View lookups
- The whole navigation system
- Plugins
Finally, the Setup class is also responsible for initializing your App class.
Luckily for us, all this functionality is provided for you automatically, unless you want / need to use a custom Setup class (since it is an excellent place to register your own services / plugins, it is often the case).
Add your View
Create an initial Page
Create a folder named Views.
Within this folder, add a new Xaml ‘Blank Page’ and call it TipView.xaml.
This will generate two files:
TipView.xamlTipView.xaml.cs
Turn TipView into the MvvmCross View for TipViewModel
Change the class inheritance to this:
public sealed partial class TipView : MvxWindowsPage
And also add a MvxViewForAttribute over the class, to let MvvmCross know which ViewModel should be attached to it:
[MvxViewFor(typeof(TipViewModel))]
public sealed partial class TipView : MvxWindowsPage
Altogether this looks like:
using MvvmCross.Platforms.Uap.Views;
using MvvmCross.ViewModels;
using TipCalc.Core.ViewModels;

namespace TipCalc.UWP.Views
{
    [MvxViewFor(typeof(TipViewModel))]
    public sealed partial class TipView : MvxWindowsPage
    {
        public TipView()
        {
            InitializeComponent();
        }
    }
}
Edit the XAML layout
Open the xaml file for our UWP TipView.
Same as we did for the other platforms, we won’t do into much depth at all here about using Xaml. We will focus on everything which is MvvmCross related instead.
In order to complete our UI, please add the following elements:
- A
StackPanelhost, which will contain:- A
TextBlockwhich text should beSubTotal - A bound
TextBoxfor theSubTotalproperty ofTipViewModel - A
TextBlockwhich text should beGenerosity - A bound
Sliderfor theGenerosityproperty ofTipViewModel - A
TextBlockwhich text should beTip to leave - A bound
TextBlockfor theTipproperty ofTipViewModel
- A
The full page will look like this:
<views:MvxWindowsPage x:Class="TipCalc.UWP.Views.TipView"
                      xmlns="http://schemas.microsoft.com/winfx/2006/xaml/presentation"
                      xmlns:x="http://schemas.microsoft.com/winfx/2006/xaml"
                      xmlns:d="http://schemas.microsoft.com/expression/blend/2008"
                      xmlns:mc="http://schemas.openxmlformats.org/markup-compatibility/2006"
                      xmlns:views="using:MvvmCross.Platforms.Uap.Views"
                      mc:Ignorable="d">
    <StackPanel Margin="12,0,12,0">
        <TextBlock Text="SubTotal" />
        <TextBox Text="{Binding SubTotal, Mode=TwoWay, UpdateSourceTrigger=PropertyChanged}" />
        <TextBlock Text="Generosity" />
        <Slider Value="{Binding Generosity,Mode=TwoWay}"
                SmallChange="1"
                LargeChange="10"
                Minimum="0"
                Maximum="100" />
        <TextBlock Text="Tip to leave" />
        <TextBlock Text="{Binding Tip}" />
    </StackPanel>
</views:MvxWindowsPage>
Note that in XAML, OneWay binding is generally the default. To provide TwoWay binding we explicitly add Mode to our binding expressions: e.g. Value="{Binding Generosity,Mode=TwoWay}"
Second note the binding for the TextBox uses UpdateSourceTrigger=PropertyChanged so that the SubTotal property of TipViewModel is updated immediately rather than when the TextBox loses focus.
Although this sample only shows simple bindings, the infrastructure built within MvvmCross is really powerful! Our data-binding engine supports ValueConverters, ValueCombiners, FallbackValues, different modes of bindings and a super straight forward mechanism to add your own custom bindings.
The UWP UI is complete!
At this point you should be able to run your application either on the Local Machine.
When it starts… you should see this for the local machine:
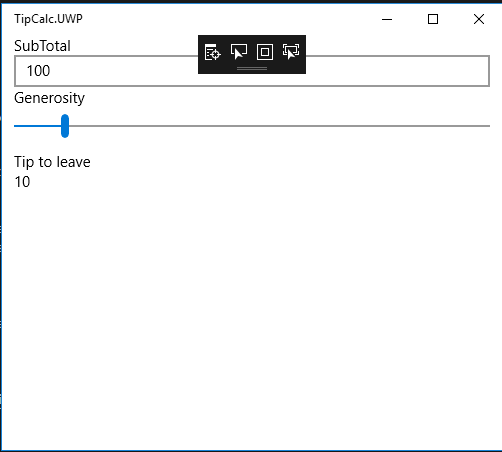
Moving on…
There’s more we could do to make this User Interface nicer and to make the app richer… but for this first application, we will leave it here for now.
Let’s move on to the next piece of Windows, WPF!