TipCalc Android Project
EditWe started with the goal of creating an app to help calculate what tip to leave in a restaurant.
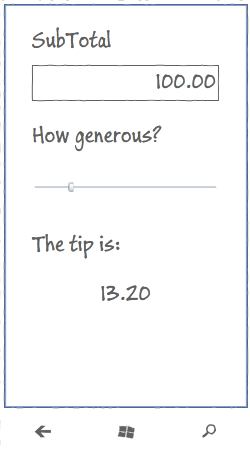
We had a plan to produce a UI based on this concept:
To satisfy this we built a ‘Core’ .NET Standard project which contained:
- Our ‘business logic’ -
ICalculationService - Our ViewModel -
TipViewModel - Our
App- which contains some bootstrapping code.
We’re now ready to add out first User Interface!
So… let’s start with Android.
Same as we did with the Core project, we will use a standard template to create the Android project.
Create a new Android project
Add a new project to your solution - a ‘.Net Android Application’ application with name TipCalc.Droid
Within this, you’ll find the normal Android application constructs:
- The Assets folder
- The Resources folder
- The MainActivity.cs
Delete MainActivity.cs
No-one really needs that MainActivity :)
Also, make sure you delete activity_main.xml in the /resources/Layout folder.
Install MvvmCross
Open the Nuget Package Manager and search for the package MvvmCross.
If you don’t really enjoy the NuGet UI experience, then you can alternatively open the Package Manager Console, and type:
Install-Package MvvmCross
Add a reference to TipCalc.Core project
Add a reference to your TipCalc.Core project - the project we created in the first step.
Creating Setup class
Every MvvmCross UI project requires a Setup class. The Setup class is responsible for performing the initialization of the MvvmCross framework, including:
- The IoC Container and DI engine
- The Data-Binding engine
- The ViewModel / View lookups
- The whole navigation system
- Plugins
The Setup class is also responsible for initializing your App class.
Finally, let’s add Setup class:
using Microsoft.Extensions.Logging;
using MvvmCross.Platforms.Android.Core;
using TipCalc.Core;

namespace TipCalc.Droid;

public class Setup : MvxAndroidSetup<App>
{
    protected override ILoggerFactory? CreateLogFactory() => default!;

    protected override ILoggerProvider? CreateLogProvider() => default!;
}
Add an Android Application class
The Android Application class will allow us to specify the MvvmCross framework some key classes to be used for initialization:
using Android.Runtime;
using MvvmCross.Platforms.Android.Views;
using TipCalc.Core;

namespace TipCalc.Droid;

[Application]
public class MainApplication : MvxAndroidApplication<Setup, App>
{
    public MainApplication(IntPtr javaReference, JniHandleOwnership transfer)
        : base(javaReference, transfer)
    {
    }
}
We won’t go deeper into what role does MainApplication have on the Android platform, but let’s talk a bit about the MvvmCross bits:
MvxAndroidApplicationprovides some behavior for initializing the framework in runtime - although it isn’t really the only way to configure the Android project.Apphere is a reference to ourTipCalc.Core.Appclass.
Add your View
Add the Android Layout XML (AXML)
This tutorial doesn’t attempt to give an introduction to Android XML layout, but any knowledge is actually really necessary at this point. If you are very new to Android, you can read more about Android XML on the official documentation.
To achieve the basic layout that we need:
-
We will add a new .xml file - called
TipView.xmlinto the/Resources/Layoutfolder. -
We will edit this file using the XML editor - the designer gives us a visual display, while the VS editor sometimes gives us XML Intellisense. Open the file, go to the “Source” tab and replace the file content with the following code:
<?xml version="1.0" encoding="utf-8"?>
<LinearLayout xmlns:android="http://schemas.android.com/apk/res/android"
    android:orientation="vertical"
    android:layout_width="match_parent"
    android:layout_height="match_parent" />
- We will now add a local app namespace -
http://schemas.android.com/apk/res-auto- which is just like adding a namespace in XAML:
<?xml version="1.0" encoding="utf-8"?>
<LinearLayout xmlns:android="http://schemas.android.com/apk/res/android"
    xmlns:local="http://schemas.android.com/apk/res-auto"
    android:orientation="vertical"
    android:layout_width="match_parent"
    android:layout_height="match_parent" />
-
Notice that the
LinearLayouthas by default a horizontal orientation - for XAMLites, this layout is just like aStackPanelexcept that it is very important to specify the vertical orientation -
Within this layout we will add some
TextViews to provide some static text labels:
<TextView
    android:layout_width="match_parent"
    android:layout_height="wrap_content"
    android:text="SubTotal" />
<TextView
    android:layout_width="match_parent"
    android:layout_height="wrap_content"
    android:text="Generosity" />
<TextView
    android:layout_width="match_parent"
    android:layout_height="wrap_content"
    android:text="Tip to leave" />
- We will also add a short, wide
Viewwith a yellow background to provide a small amount of chrome after the lastTextView:
<View
    android:layout_width="match_parent"
    android:layout_height="1dp"
    android:background="#ffff00" />
-
Now it’s time to add some
Views for data display and data entry, which we will also databind to properties in ourTipViewModel:- Add an
EditTextfor text data entry of theSubTotal:
- Add an
<EditText
    android:layout_width="match_parent"
    android:layout_height="wrap_content"
    local:MvxBind="Text SubTotal" />
- Add a
SeekBarfor touch/slide entry of theGenerosity:
<SeekBar
    android:layout_width="match_parent"
    android:layout_height="wrap_content"
    android:max="100"
    local:MvxBind="Progress Generosity" />
- Now for a last step, add a
TextViewto display the finalTipresult:
<TextView
    android:layout_width="match_parent"
    android:layout_height="wrap_content"
    local:MvxBind="Text Tip" />
Putting everything together, your .axml file should look like this:
<?xml version="1.0" encoding="utf-8"?>
<LinearLayout xmlns:android="http://schemas.android.com/apk/res/android"
    xmlns:local="http://schemas.android.com/apk/res-auto"
    android:orientation="vertical"
    android:layout_width="match_parent"
    android:layout_height="match_parent">
    <TextView
          android:layout_width="match_parent"
          android:layout_height="wrap_content"
          android:text="SubTotal" />
    <EditText
          android:layout_width="match_parent"
          android:layout_height="wrap_content"
          local:MvxBind="Text SubTotal" />
    <TextView
          android:layout_width="match_parent"
          android:layout_height="wrap_content"
          android:text="Generosity" />
    <SeekBar
          android:layout_width="match_parent"
          android:layout_height="wrap_content"
          android:max="100"
          local:MvxBind="Progress Generosity" />
    <View
          android:layout_width="match_parent"
          android:layout_height="1dp"
          android:background="#ffff00" />
    <TextView
          android:layout_width="match_parent"
          android:layout_height="wrap_content"
          android:text="Tip to leave" />
    <TextView
          android:layout_width="match_parent"
          android:layout_height="wrap_content"
          local:MvxBind="Text Tip" />
</LinearLayout>
About the data-binding syntax
You may have noticed that each of the data-binding blocks within our first sample look very similar, for example:
local:MvxBind="Text SubTotal"
What this line means is:
Data-Binding:
- The property
Textof theTextView - To the property
SubTotalon theDataContext- which in this case will be aTipViewModel.
This means:
- Whenever the
TipViewModelcallsRaisePropertyChangedonSubTotalthen theViewshould update its content - And whenever the user enters text into the
View, theSubTotalvalue should beseton theTipViewModel
Note that this TwoWay binding is different to XAML where generally the default BindingMode is only OneWay.
Add the View class
With our .axml layout complete, we can now move back to C# and add an Activity, which is used to display the content. These Activity classes are very special objects on Android, which provide a context to your app and a placeholder to display widgets on the UI.
This Activity will act as our MVVM View. Please follow these steps:
-
Create a
Viewsfolder within your TipCalc.Droid project. -
Within this folder create a new C# class called
TipView. -
This class should inherit from
MvxActivity<TipViewModel>:
public class TipView : MvxActivity<TipViewModel>
- Add an
Activityattribute over the class and set theMainLauncherproperty totrue. This attribute lets Xamarin.Android add it automatically to your AndroidManifest file:
[Activity(Label = "Tip Calculator", MainLauncher = true, Theme = "@style/Theme.AppCompat")]
- Override the method
OnCreateand callSetContentView()right after the call to base:
protected override void OnCreate(Bundle bundle)
{
    base.OnCreate(bundle);
    SetContentView(Resource.Layout.TipView);
}
As a result this completed class is very simple:
using MvvmCross.Platforms.Android.Views;
using TipCalc.Core.ViewModels;

namespace TipCalc.Droid;

[Activity(Label = "Tip Calculator", MainLauncher = true, Theme = "@style/Theme.AppCompat")]
public class TipView : MvxActivity<TipViewModel>
{
    protected override void OnCreate(Bundle bundle)
    {
        base.OnCreate(bundle);
        SetContentView(Resource.Layout.TipView);
    }
}
The Android project is complete!
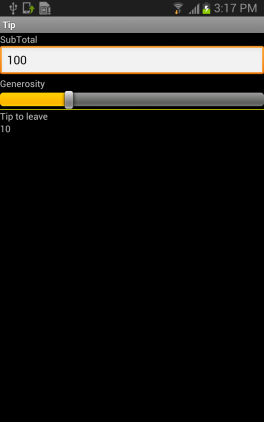
At this point you should be able to run your application.
When it starts… you should see something like this:
If you then want to make it ‘more beautiful’, then try adding a few attributes to some of your .xml - things like:
android:background="#00007f"
android:textColor="#ffffff"
android:textSize="24dp"
android:layout_margin="30dp"
android:padding="20dp"
android:layout_marginTop="10dp"
Moving on
There’s more we could do to make this User Interface nicer and to make the app richer… but for this first application, we will leave it here for now.
Let’s move on to Xamarin.iOS!